Integrate Razorpay in your React app

Full × Stack × Web × Developer || React × Node × Express × MongoDB || Football lover ⚽ Book worm 📖 Obsessed with coffee ☕ & Feluda 🕵️♂️
What is Razorpay?
Razorpay is a payments solution in India that allows businesses to access all payment modes including credit card, debit card, netbanking, UPI and other popular wallets.
Don't confuse India-only business with single currency payments.
Razorpay accepts payments in almost all currencies.
Before integrating the payment gateway in our app let us understand the payment flow of razorpay.
Payment Flow
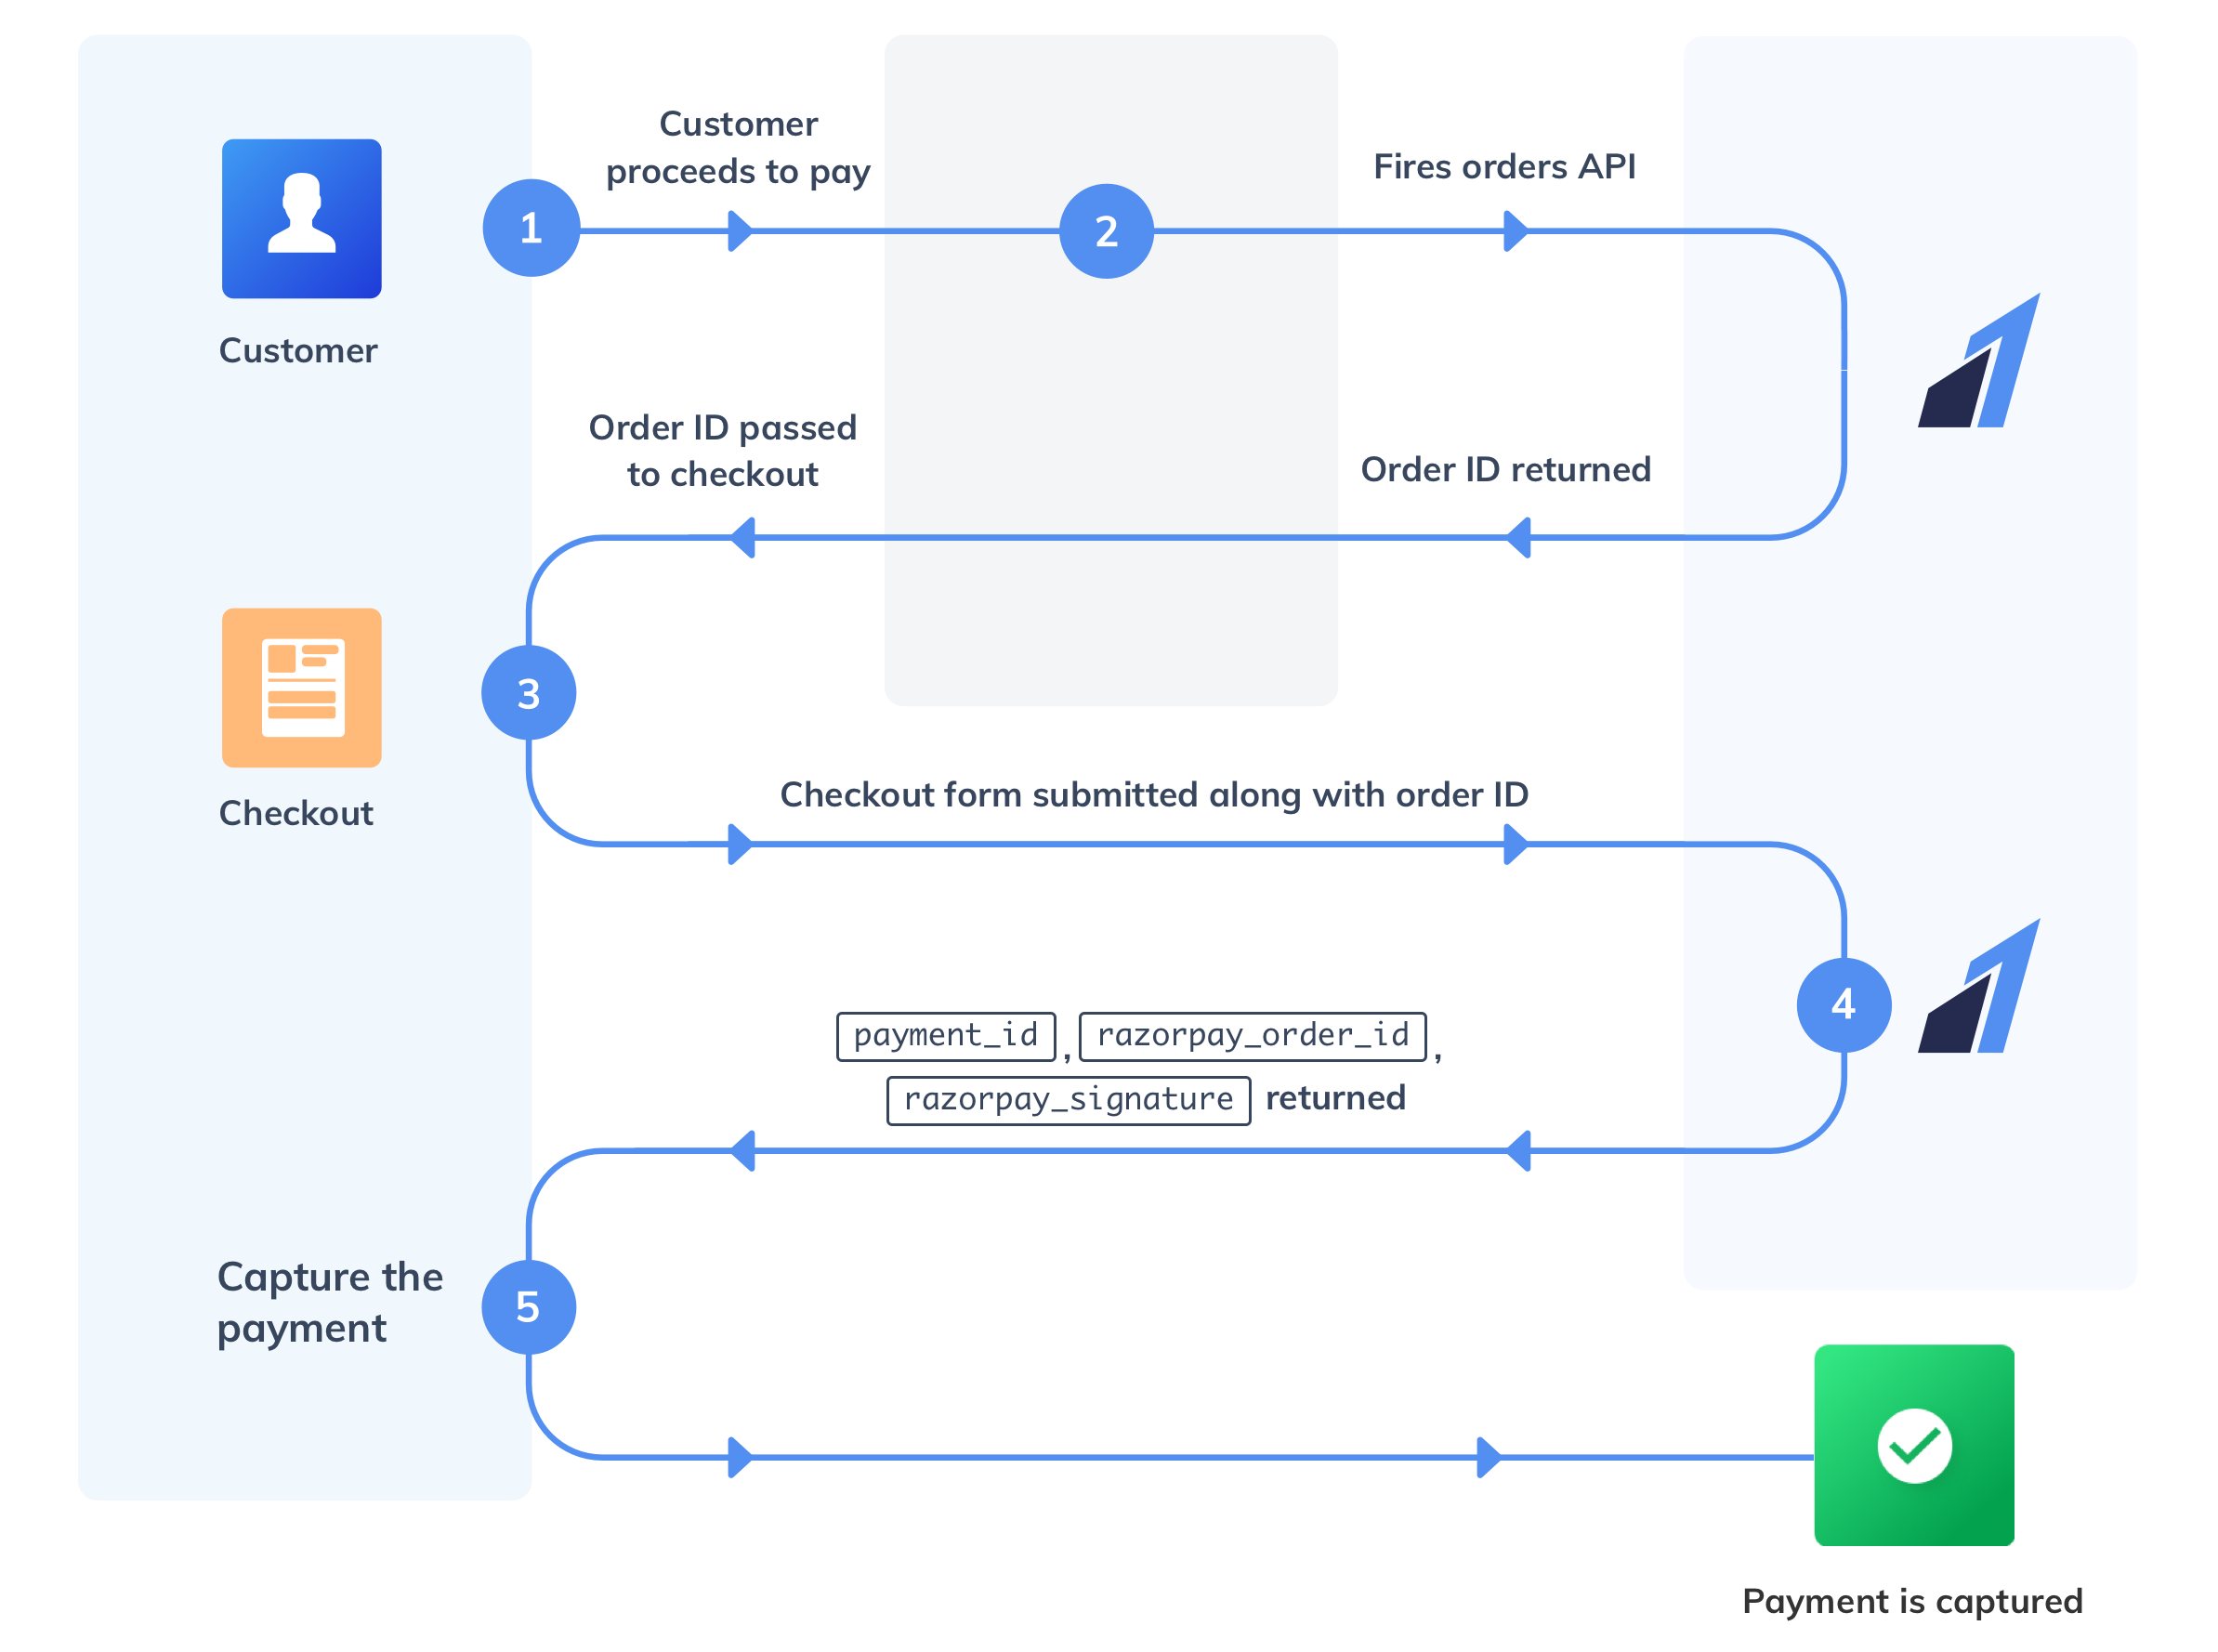
- Customers place an order on your website or app
- You create an order from your server using the Razorpay instance.
- You then pass the Order ID to the checkout and collect payment details.
- Authentication of a payment then happens in your back-end by verifying the signature returned by Razorpay.
- Capture the payment.
This is a high-level representation of the Razorpay payment flow. You can TRY OUT the payment flow live here.
Let's Integrate Razorpay in Our App
Create a Razorpay account
Navigate to Razorpay Dashboard and create a account for yourself. No need to activate it as we are going to work in Test mode.
Go to Settings tab and generate your API keys and save them somewhere. We'll need this later.
Create our server
Create a folder in your pc and initialize npm on that folder.
npm init
We'll need to install some dependencies for our server. Install these dependencies.
- express
- razorpay
- dotenv
- crypto (for verifying the signature in the last step)
- mongoose (Optional : If you waant to save the details in a database)
npm i express razorpay dotenv crypto mongoose
Now create a file server.js in the root directory and initialize your express server.
const express = require("express");

const app = express();
const port = process.env.PORT || 5000;

// middlewares
app.use(express.json({ extended: false }));

app.listen(port, () => console.log(`server started on port ${port}`));
So now our server is running on localhost:5000 and we need to add some routes for handling the payment steps in our backend.
Save the API keys
We'll use .env file to save our keys. Create a file .env in your root directory.
Add the following code inside .env file and replace the values with your keys.
RAZORPAY_SECRET=<your razorpay secret>
RAZORPAY_KEY_ID=<your razorpay ket id>
Don't add any quotes.
Add route for creating orders
Create a new folder called routes in your root directory and add a new file payment.js inside the routes folder.
- We need to create a
POSTroute to create a order. - For that we'll have to create a instance of Razorpay.
- Then we'll call
instance.orders.create()
require("dotenv").config();
const express = require("express");
const Razorpay = require("razorpay");

const router = express.Router();

router.post("/orders", async (req, res) => {
    try {
        const instance = new Razorpay({
            key_id: process.env.RAZORPAY_KEY_ID,
            key_secret: process.env.RAZORPAY_SECRET,
        });

        const options = {
            amount: 50000, // amount in smallest currency unit
            currency: "INR",
            receipt: "receipt_order_74394",
        };

        const order = await instance.orders.create(options);

        if (!order) return res.status(500).send("Some error occured");

        res.json(order);
    } catch (error) {
        res.status(500).send(error);
    }
});
Note: the amount needs to be in the smallest currency unit i.e for 500 Rupess you'll have to spicify 50000 in the amount variable
Now import this payment.js route file in your server.js file to enable the route. Now your server.js file will look like this...
const express = require("express");

const app = express();
const port = process.env.PORT || 5000;

// middlewares
app.use(express.json({ extended: false }));

// route included
app.use("/payment", require("./routes/payment"));

app.listen(port, () => console.log(`server started on port ${port}`));
Now we'll need to have a front-end form where we'll make the request for creating the order.
Create a React app
We'll create the react app inside our root directory.
npx create-react-app client
I've given my app name as client. You can give any name you want.
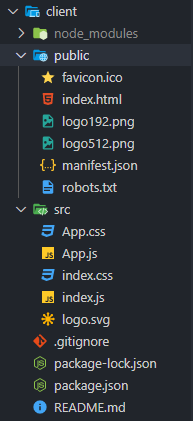
After all this let's review our folder structure, So that you don't get lost.
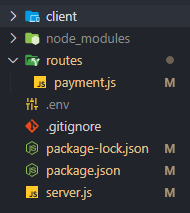
Now lets clean up all the boilerplate react code. After clean up your react app folder should look like this. You can delete all useless files from the folder.
Also install axios inside your react app folder for making requests to the back-end.
cd client
npm i axios
Add a button to start the payment flow
Go to App.js file and replace all the code with the following.
import React from "react";
import logo from "./logo.svg";
import "./App.css";
import axios from "axios";

function App() {

    return (
        <div className="App">
            <header className="App-header">
                <img src={logo} className="App-logo" alt="logo" />
                <p>Buy React now!</p>
                <button className="App-link" onClick={displayRazorpay}>
                    Pay ₹500
                </button>
            </header>
        </div>
    );
}

export default App;
You can see I've only added a button and assigned a function displayRazorpay to the onClick event. So now lets create that function.
We'll need to do 3 things when the button is clicked.
- Load the
Razorpay checkout scriptthat does all the work behind the scene for us. - Make a
POSTrequest to our backend route/payment/ordersto create a new order, which will return details of the order including theidandamount. - Then use that
idandamountand finally show the Razorpay popup.
For loading the script I've added a function loadScript that takes a script src string as input and returns a Promise that loads the script.
function loadScript(src) {
        return new Promise((resolve) => {
            const script = document.createElement("script");
            script.src = src;
            script.onload = () => {
                resolve(true);
            };
            script.onerror = () => {
                resolve(false);
            };
            document.body.appendChild(script);
        });
}
Then I'll add the function displayRazorpay that will first load the script, then make a post request to our back-end route and finally show the popup.
async function displayRazorpay() {
        const res = await loadScript(
            "https://checkout.razorpay.com/v1/checkout.js"
        );

        if (!res) {
            alert("Razorpay SDK failed to load. Are you online?");
            return;
        }

        // creating a new order
        const result = await axios.post("http://localhost:5000/payment/orders");

        if (!result) {
            alert("Server error. Are you online?");
            return;
        }

        // Getting the order details back
        const { amount, id: order_id, currency } = result.data;

        const options = {
            key: "rzp_test_r6FiJfddJh76SI", // Enter the Key ID generated from the Dashboard
            amount: amount.toString(),
            currency: currency,
            name: "Soumya Corp.",
            description: "Test Transaction",
            image: { logo },
            order_id: order_id,
            handler: async function (response) {
                const data = {
                    orderCreationId: order_id,
                    razorpayPaymentId: response.razorpay_payment_id,
                    razorpayOrderId: response.razorpay_order_id,
                    razorpaySignature: response.razorpay_signature,
                };

                const result = await axios.post("http://localhost:5000/payment/success", data);

                alert(result.data.msg);
            },
            prefill: {
                name: "Soumya Dey",
                email: "SoumyaDey@example.com",
                contact: "9999999999",
            },
            notes: {
                address: "Soumya Dey Corporate Office",
            },
            theme: {
                color: "#61dafb",
            },
        };

        const paymentObject = new window.Razorpay(options);
        paymentObject.open();
}
For every successful payment, the checkout returns:
- razorpay_payment_id
- razorpay_order_id
- razorpay_signature
We can access these values inside the handler property. And as you can see I've made a request to a new back-end route and sent those details with the order id that we recieved while creating the order before. This is for verifying the whether the payment is legit or not.
Don't confuse the "razorpay_order_id" with the "order_id" we got
while creating a new order. These two are entirely different.
Now your App.js file should look like the following.
import React from "react";
import logo from "./logo.svg";
import "./App.css";
import axios from "axios";

function App() {
    function loadScript(src) {
        return new Promise((resolve) => {
            const script = document.createElement("script");
            script.src = src;
            script.onload = () => {
                resolve(true);
            };
            script.onerror = () => {
                resolve(false);
            };
            document.body.appendChild(script);
        });
    }

    async function displayRazorpay() {
        const res = await loadScript(
            "https://checkout.razorpay.com/v1/checkout.js"
        );

        if (!res) {
            alert("Razorpay SDK failed to load. Are you online?");
            return;
        }

        const result = await axios.post("http://localhost:5000/payment/orders");

        if (!result) {
            alert("Server error. Are you online?");
            return;
        }

        const { amount, id: order_id, currency } = result.data;

        const options = {
            key: "rzp_test_r6FiJfddJh76SI", // Enter the Key ID generated from the Dashboard
            amount: amount.toString(),
            currency: currency,
            name: "Soumya Corp.",
            description: "Test Transaction",
            image: { logo },
            order_id: order_id,
            handler: async function (response) {
                const data = {
                    orderCreationId: order_id,
                    razorpayPaymentId: response.razorpay_payment_id,
                    razorpayOrderId: response.razorpay_order_id,
                    razorpaySignature: response.razorpay_signature,
                };

                const result = await axios.post("http://localhost:5000/payment/success", data);

                alert(result.data.msg);
            },
            prefill: {
                name: "Soumya Dey",
                email: "SoumyaDey@example.com",
                contact: "9999999999",
            },
            notes: {
                address: "Soumya Dey Corporate Office",
            },
            theme: {
                color: "#61dafb",
            },
        };

        const paymentObject = new window.Razorpay(options);
        paymentObject.open();
    }

    return (
        <div className="App">
            <header className="App-header">
                <img src={logo} className="App-logo" alt="logo" />
                <p>Buy React now!</p>
                <button className="App-link" onClick={displayRazorpay}>
                    Pay ₹500
                </button>
            </header>
        </div>
    );
}

export default App;
If you start your react app the app should look like this in the browser

And if you click the Pay ₹500 button a popup should appear.
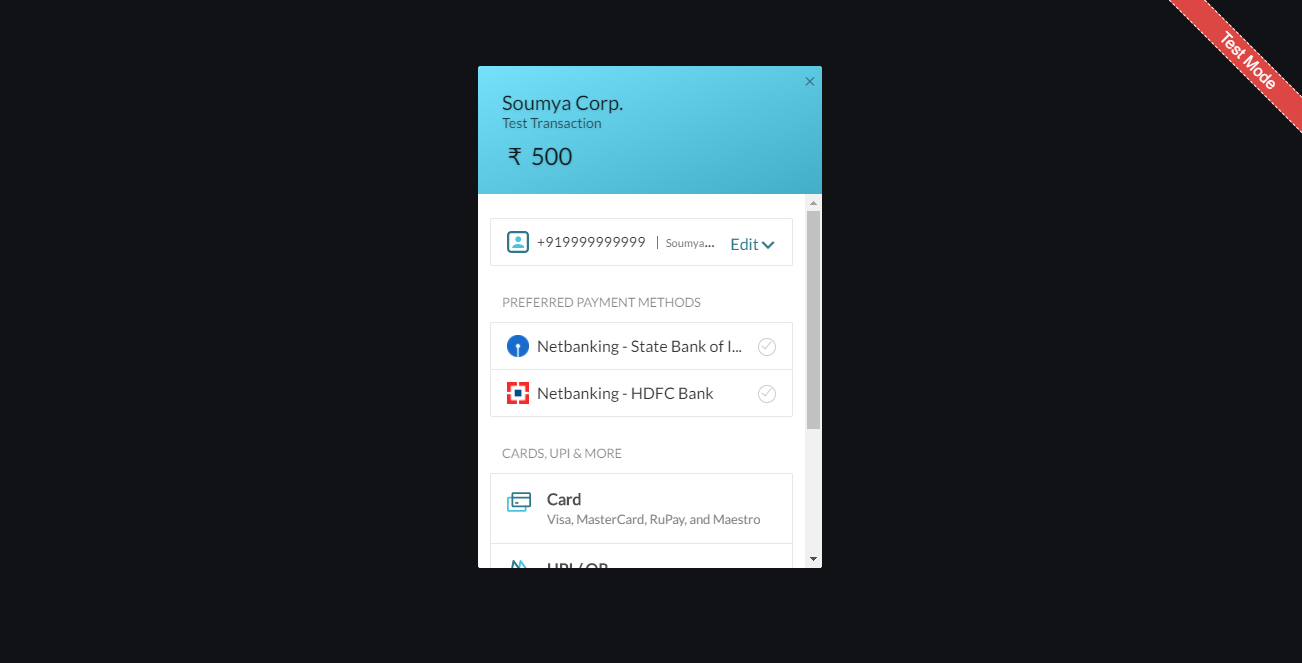
But don't proceed with the payment yet. We need to add another route in our back-end to verify the payment.
Verify the payment
For this step we just need to create a signature by ourselves in the back-end and check if our signature is same as the signature sent by razorpay.
Remember, after successful payment our react app is sending back four values to the backend route /payment/success.
- orderCreationId (order id, we got back while creating the order)
- razorpayPaymentId
- razorpayOrderId
- razorpaySignature
We'll need to use the SHA256 algorithm, use the razorpayPaymentId and the orderCreationId to construct a HMAC hex digest. Then compare the digest with the razorpaySignature. If both are equal, then out payment is verified.
Create a route for verification
Navigate to payment.js file inside your routes folder and the following POST route.
router.post("/success", async (req, res) => {
    try {
        // getting the details back from our font-end
        const {
            orderCreationId,
            razorpayPaymentId,
            razorpayOrderId,
            razorpaySignature,
        } = req.body;

        // Creating our own digest
        // The format should be like this:
        // digest = hmac_sha256(orderCreationId + "|" + razorpayPaymentId, secret);
        const shasum = crypto.createHmac("sha256", "w2lBtgmeuDUfnJVp43UpcaiT");

        shasum.update(`${orderCreationId}|${razorpayPaymentId}`);

        const digest = shasum.digest("hex");

        // comaparing our digest with the actual signature
        if (digest !== razorpaySignature)
            return res.status(400).json({ msg: "Transaction not legit!" });

        // THE PAYMENT IS LEGIT & VERIFIED
        // YOU CAN SAVE THE DETAILS IN YOUR DATABASE IF YOU WANT

        res.json({
            msg: "success",
            orderId: razorpayOrderId,
            paymentId: razorpayPaymentId,
        });
    } catch (error) {
        res.status(500).send(error);
    }
});
Now all the steps are completed.
Now you can proceed to make a payment and if successfull you can view the payment inside your Razorpay Dashboard in the Transactions tab.
Below are some demo card details you can use to test the payment flow in Test mode.

Use any valid expiration date in the future and any random CVV to create a successful payment.
And when ready you can switch to Live mode and activate your account before production. You'll be given a new set of API keys for the Live mode.
You can find all the source code in my Github repo.
When you are there don't forget to Follow me on Github
Thanks a lot for reading. Follow me Here or Follow me on Dev.to if you like my writings.
I'll also make a blog post about Integrating Stripe with React. Stay tuned for that!


